

Youtube My Outdoor Siphon Valve Faucit Won't Shut?
Bank check The Dumb Stuff.
If the valve won't open at all, or doesn't fully open, start with the obvious things just to be certain. I know, any idiot knows better, only even united states pros periodically overlook something really elementary and obvious.
Tip: There are labeled photos of some of the more pop valve models showing the various valve controls (such equally flow-controls, on/off levers, and drain screws) mentioned in this article at this folio: Anti-Siphon Valves with Parts Labeled.
- Is the water supply turned on?
- Is there a shut off valve on the water supply that may have been closed? Once I had a system I couldn't get to work, couldn't find any closed valves, but still no water to the sprinklers. Turned out the metropolis water visitor had closed a valve in the street for street work they were doing and forgot to reopen information technology!
- Check the flow control on the valve to brand sure it isn't closed or partially airtight. Information technology is oftentimes desirable for the flow control to be left partially closed, simply if information technology is restricting the menstruation likewise much that could be the problem. On some valves the menstruum control doesn't have a handle, information technology is just a small spiral in the valve lid. If unsure, await up your valve model at the manufacturer'southward website to see if they have a drawing of the valve showing a flow control device location. Unfortunately, some cheap valves do non have a menses control device.
Manual Operation Test
Try manually opening the valve, using the on/off lever on top of the valve body. Some valves utilize a bleed screw to manually open up them, and then if y'all don't encounter a lever labeled on/off or open up/close, await for a screw, typically the screw has a knob handle to allow it to be twisted past paw. Practice not fully remove a drain spiral! But turn information technology most 1-2 to 1 full turn, water volition squirt out from under the spiral and the valve should open. Some valves have both a bleed spiral and a on/off lever, on those valves I by and large apply the drain spiral as I have found it works better if the valve is existence stubborn. If the valve opens correctly and fully when using the manual open lever or bleed screw, and then the problem may be electric. If the valve does not open up fully when using the manual open feature, skip over the next department on electric issues.
Bones Electric Tests
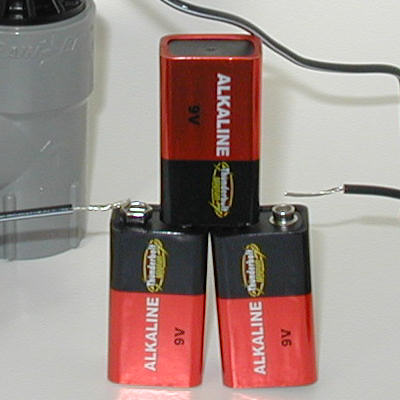
If you don't accept a valve actuator test unit, first by making yourself a dwelling house-made valve activator using three nine-volt batteries. See my page with total instructions for making a irrigation solenoid valve activator (it'due south easy and only takes about ii minutes!)
Now use your actuator to test your solenoid and wires:
- NOTE: make sure you are using fresh, brand new batteries in your actuator! Information technology takes a lot of amperage to open up a valve and worn or old batteries won't do the job. Don't waste your time tracking down false results acquired by bad batteries!!!
- Note #2: 24 VAC does non feel skillful if yous shock yourself with it, particularly if yous are wet. Don't touch bare wires without safety gloves on!
- Disconnect the wires from the valve solenoid. Bear upon the valve solenoid wires to the terminals on your activator. The valve should open. If the valve fully opens then the problem is Not the valve, the problem is with the wires leading from the controller (timer) to the valve, or possibly the controller is broken. Continue with the adjacent pace. If the valve does non open up, then skip the rest of the electric diagnosis items. The trouble is with the valve or the valve solenoid.
- Controller problems are very rare, it is much more likely the problem is a cleaved wire. Do Not try to test the controller by using a wire to create a short-excursion "spark" between the terminals! You may fry your controller! Kickoff reread the controller manual on how to wire the valve circuits and make sure you lot don't have them wired wrong. Optional: Y'all tin can test the controller using a multimeter if you have one and know how to use it. The controller output to the valves is 24 VAC. Most mod controllers will testify a positive test for 24VAC even if the circuit is off, y'all need to test the circuit with a load. Don't panic if you don't know what that means or don't accept a multimeter. Merely go to the side by side step.
- Y'all tin can examination the wire very but. If the wires from the controller to the valve are asunder from the valve reattach them to the valve solenoid now.
- Next remove the wires for the common and the "pb" wire circuit to your valve from the controller terminals.
- Adhere your valve actuator to the 2 wires at the controller stop, only like you did to the solenoid wires. The valve should come on. If it doesn't open, or but opens partially, the wires from the controller to the valve are either damaged (cut or brusk circuiting), or you are testing the wrong wires. Are y'all sure you have the correct pair of wires for this valve? That'south frequently the trouble with a newly installed system! It's pretty piece of cake to get the wires mixed upwardly, especially if they do not have colour-coded insulation. Another source of the problem may be damaged insulation on the buried wire. If the insulation on the wire has been removed or damaged someplace along the length of the wire information technology can cause a voltage leak. A nick or partial cut in the wire may cause resistance to the electric current in the wire. These wire problems cause the solenoid to not receive sufficient power to fully open up the valve.
- If the valve does turn on fully the problem is the controller. Most modern controllers are not user repairable. If it is under warranty contact the manufacturer for instructions. They may enquire you to do some additional tests. If the controller is not still under warranty you can contact a professional irrigation repair outfit for a repair quote. For most low-cost homeowner controllers it is cheaper to but replace the controller with a new ane. If your current controller is not a Smart Controller you should consider replacing it with one. A cocky-adjusting Smart Controller will salvage you a lot of water and endeavor.
Valve Cleaning and Repair
If you've tested the controller and wires and they are OK, then the problem is with the valve itself. You have two choices: remove and supplant the valve, or disassemble the valve to expect for problems. Which way you become depends on which is easier for y'all to do. I more often than not effort to clean the valve rather than replace it at this point.
Replacing a valve: Removing and replacing a valve can be a large task if the valve is fully installed. Basically this is a bandy out, take a photo of the old valve earlier you lot remove it, so remove information technology and install the new one in it's identify. You probably will need to cut the pipe on the outlet side of the valve so you can turn the valve torso to unscrew it from the inlet piping and become it out. Some valves are installed so close together that you need to cut the pipage on both the inlet and outlet sides, this is especially true of anti-siphon valves. Once the sometime valve is out, yous install a new one in the same location. Finally you need to repair the pipe if you cut it. If the piping is PVC they make special couplers for repairing pipes that make the task easier. Remember to completely water proof all the wire splices!
Note: a lot of anti-siphon valves are not properly installed. Fifty-fifty sprinkler installation companies don't use the care they should to insure correct installation, and a wrong installation may be the source of your valve bug. Encounter the article on How to Properly Install an Anti-Siphon Valve to aid y'all become it in right this time!
Clean & Repair a Valve: Well-nigh people try to repair the valve rather than supervene upon information technology. I actually think a repair is often easier at this phase. If you do proceed with disassembling the valve exist sure to notice how all the parts fit together and then yous tin reassemble it when done. Tip: accept photos of the valve and how the parts fit together every bit you disassemble information technology!
- If the valve is more a couple years old you lot might desire to buy a repair kit for the valve make and model (see lesser of this page for examples of what to look for.)
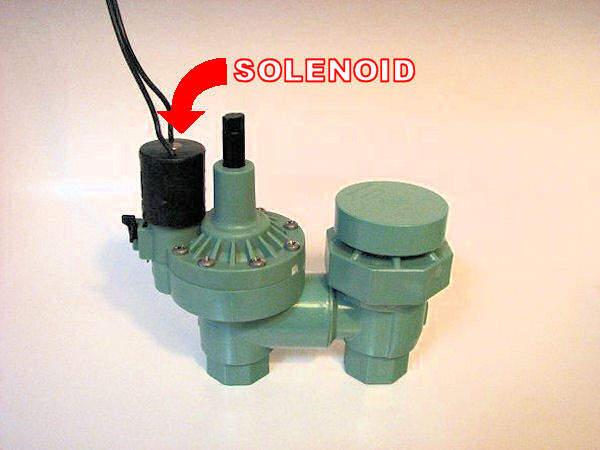
- Turn off the water supply to the valve. Remove the solenoid by unscrewing it. Note: each manufacturer's valve is slightly unlike, only the basics are the aforementioned. Your valve may look unlike from the Water-Chief brand valve shown in these photos.
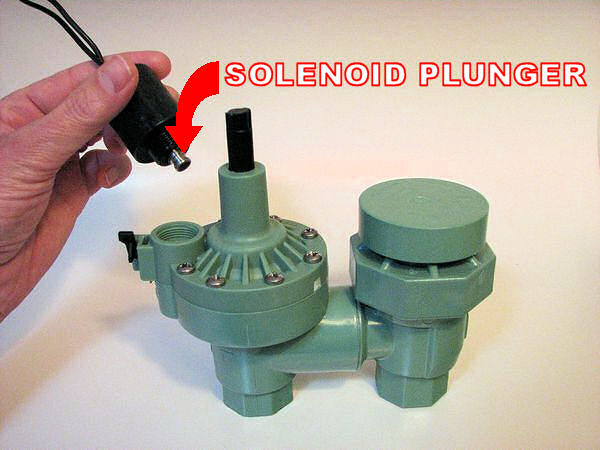
Remove solenoid The bottom of the solenoid has a spring-loaded plunger in it. After removing the solenoid hold it in ane mitt and press the plunger in with your little finger. The plunger should spring back out when you release it and move freely in and out without communicable or jamming as you lot press on it. If it doesn't the solenoid is defective, see the manufacturer's warranty info for how to go on with replacement. If the solenoid is fine clean the bottom of the solenoid with a clean towel.
Check solenoid plunger. Alert: plunger may bound out on some models! Next clean the little socket area in the valve lid that the solenoid screws into and make sure in that location aren't any sand grains or $.25 of plastic loose in that area. Using compressed air (that canned air used to dust computer parts works great, some people tin accident sufficient air with their mouths using a drinking harbinger…) gently blow air toward the ports (tiny holes) in the bottom of the solenoid socket. Proceed the air outlet a couple inches away from the ports. Do non identify the stop of the air outlet confronting the ports! If you jam the air outlet downwardly on them and smash air from a tin or air compressor into the valve y'all will flare-up the prophylactic valve diaphragm inside the valve!!! Y'all just desire to gently accident any loose debris out of the ports and socket. Now spiral the solenoid back on mitt tight. Do non over-tighten it, exercise Not utilise a wrench. It has a seal so you don't demand to creepo on it to proceed it from leaking. If you over-tighten the solenoid and strength it too far in it will distort the plastic and the plunger will jam. Now with the solenoid back on, don't bother to rewire it yet. Plow on the water and bank check to meet if the valve works manually. Sometimes the solenoids aren't installed correctly and this is all it takes to gear up the problem. If the valve now works rewire it and you're washed. If the valve still doesn't work get to step 2.
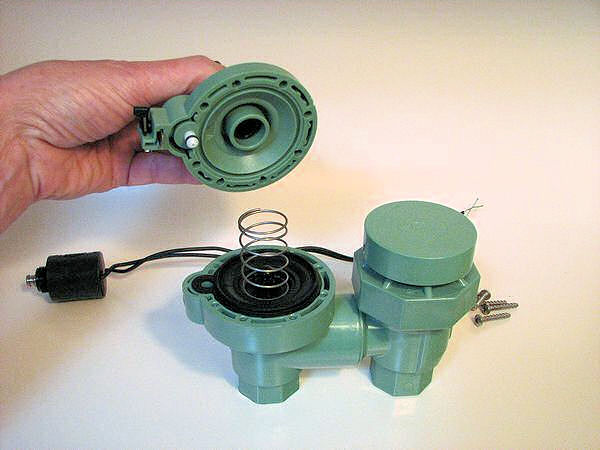
- Remove the solenoid once more. Now remove the valve's lid or cap. The lid or cap may spiral off like a jar lid, or it may be held in identify with screws. If it is the jar chapeau type you may need a strap wrench to remove the lid. (They market these jar lids equally "easy to remove", I've found few of them actually are.)
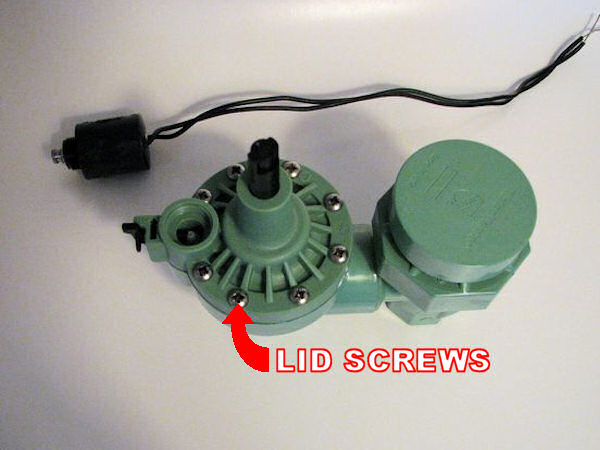
Solenoid Valve Lid Screws 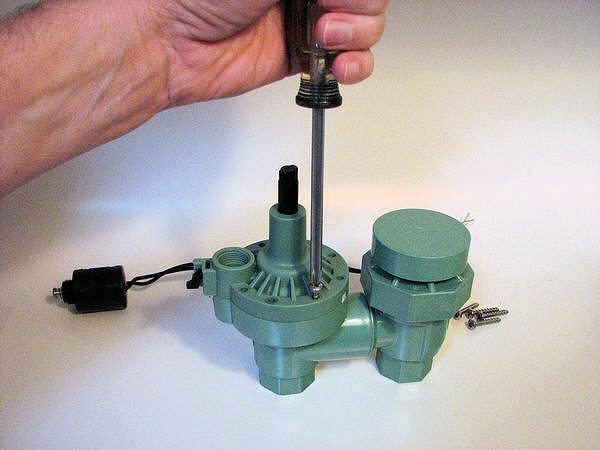
Remove lid screws or turn lid to remove if a "jar pinnacle" lid. A rubber diaphragm sits under the cap and at that place is a leap between it and the cap, watch for the spring that it doesn't get lost. Be very careful non to permit dirt become into the valve body while the cap is off, put a piece of kitchen cellophane wrap or something similar over it to go along out dirt.
Remove the lid, picket that the jump does not pop out and get lost! - Once the cap is removed expect at the cap. There are tiny holes, called ports, that go from under the solenoid to the bottom side of the cap/hat. Make sure none of those ports are blocked past a bit of manufacturing plastic or dirt. You can use a tiny piece of wire to clean them, be very careful not to scratch the plastic or enlarge the hole. Sometimes i of the ports is not drilled all the way through. In that case the valve is defective, come across your warranty information for how to replace the valve. I accept known people who accept successfully used a tiny drill bit held in their mitt to very carefully drill a blocked port clean. If you are very careful this may work, Just it may void your valve's warranty! One guy had 6 valves all with the same partially drilled port, conspicuously a manufacturing error. He drilled them by hand and every one of them worked subsequently. Your phone call on that one.
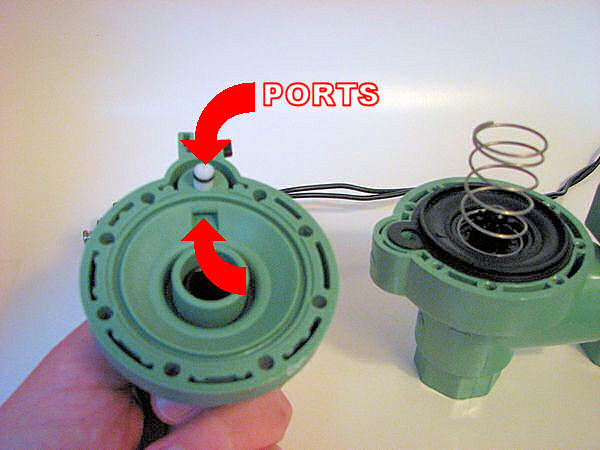
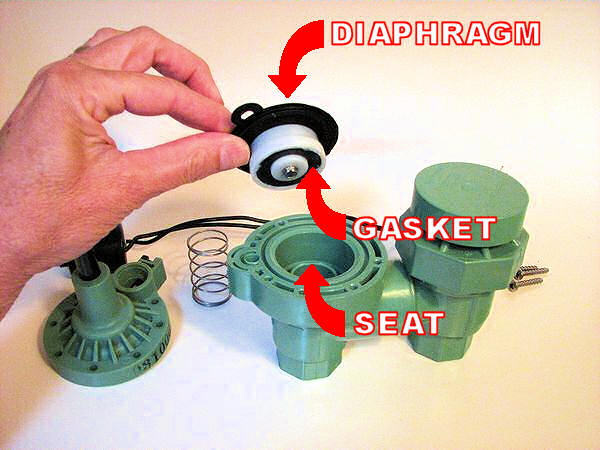
Check the pocket-size ports in the solenoid valve hat for obstructions in them. The shape and location of the ports varies with each valve make and model, there will be 2 split up ports. - The lid or the diaphragm may too have s small screen filter built into it. Wait carefully they are small and hard to encounter. This is a characteristic establish primarily on a few more expensive brands. At the time I am writing this most Rainbird valves have a tiny filter molded into the diaphragm, so if it is a Rainbird valve be sure to look for it. If there is a screen exist sure it isn't chock-full upward. A toothbrush works good for cleaning the screens.
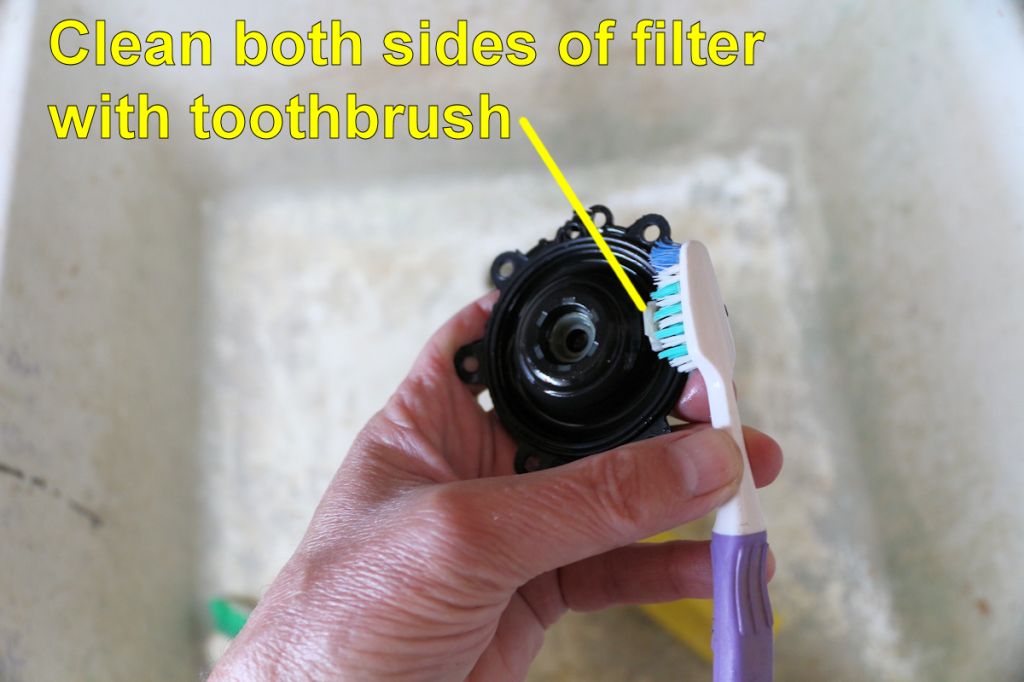
Clean 2 sided white plastic filter in Rainbird valves with a toothbrush. - Check the prophylactic diaphragm for any cracks, tears, rips, or holes in information technology. Information technology should be flexible and in very good condition. If not, replace it. Repair kits with replacement diaphragms are sold at some hardware stores, all irrigation stores, or may exist obtained online.
- Reassemble the valve when y'all are finished cleaning the parts and checking for blocked ports. Everything goes dorsum in the same place information technology came from. Be very careful not to become dirt into the valve when reassembling it. Lubricate all the o-rings using standard KY Jelly (non the heating/stimulation types.) Practise not use oil or silicone lubricants! KY Jelly is water-based and will not destroy the prophylactic seals like oil based products volition.
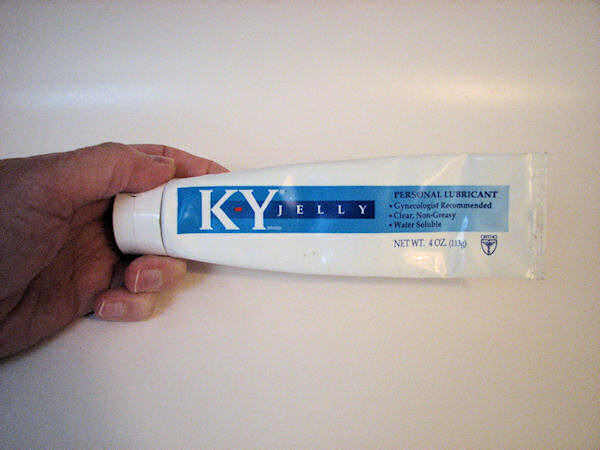
Standard KY Jelly, buy at any drug store in the feminine hygiene dept. - It should work correctly now.
Source: https://www.irrigationtutorials.com/how-to-fix-a-automatic-irrigation-valve-that-wont-open/
Posted by: woodfordgaird1974.blogspot.com
0 Response to "Youtube My Outdoor Siphon Valve Faucit Won't Shut?"
Post a Comment